

Tranquil Karkosa is the second of three different Dungeons that make up the all-encompassing Abyssal Dungeon that is The Gate of Paradise, and it is the second of three different Dungeons in the Lost Ark New Abyssal Raid’s Tranquil Karkosa. If Sea of Indolence received a C+ for complexity, Tranquil Karkosa is almost certainly a B+ in the same category. In addition to having three bosses instead of two, this eight-person Dungeon contains at least two important mechanics that must be remembered by the players.

In the first section, you will have to defeat swarming deep sea creatures and ghosts
The final boss, while simple in terms of its actual attacks, has one of the more complex Wipe mechanics in the game, and this includes Brelshaza’s in the Hildebrandt Palace, which is one of the most difficult to defeat. To ensure that a player’s underwater adventures are as painless as possible, we’ll go over everything he or she should know about this Item Level 960 (which should be relatively easy to obtain with the new Battle Pass) Abyssal Dungeon.
While the mob-clearing sections of the Tranquil Karkosa are fairly straightforward, the party of eight does nothing more than run through a variety of different areas, clearing out a few mobs in each one, and slowly making their way forward. There’s nothing in these sections that players really need to pay attention to, aside from interacting with the jumps, slides, and climbs that transport them to the next area, but there’s also nothing that’s particularly exciting.
Storm Kallivan has been eroded in the second section
The Eroded Storm Kallivan, a ghostly pirate captain (I’m not sure how that fits into the lore of Tranquil Karkosa) is the first of the Bosses to face in Tranquil Karkosa. When it comes to his regular attacks and his gimmicks, Kallivan packs a lot of punches, which makes him a pretty interesting Boss to battle in general. However, in most cases, players only need to be concerned with his Stagger Check and Lost Ark gold store, his Anchor or Pistol attack in order to survive.
Incredibly simple, Kallivan’s Stagger Check is performed by charging up a move, at the end of which, a yellow bar appears beneath him. The only catch is that he also summons an impenetrable shield around himself, which makes him virtually unbreakable. To get around this, players must pay close attention to when the shield first appears around Kallivan in order to avoid being caught. Once it appears, it is joined by the Ghost Magician summons, who all have shields that are similar to this one. Each of them must be killed and their shield broken in order for Kallivan’s shield to be dispelled. There are usually two of them, one above and one below Kallivan’s current location, and each one must be killed and their shield broken in order for Kallivan’s shield to be dispelled. To accomplish this, the party simply needs to use Weak Point skills on the Ghost Magicians until their shields are destroyed. The majority of the time, parties split in half, with four players fighting one Magician and four fighting the other. However, any configuration is acceptable as long as players are employing their Weak Point Skills or Destruction Bombs.
Although it is extremely difficult, this can still be accomplished while Kallivan is charging up his Stagger Check attack, though it is a close call. If the party is unable to defeat the Magicians in time and Dispel Kallivan’s Shield, he will not be able to be stopped and his attack will go off, wiping out the entire party in the process. Only thing to keep in mind is that these Ghost Magicians don’t appear on the mini-map, which means that party members should absolutely ping the Magicians as soon as they see them, as this is an aspect of Lost Ark New Abyssal Raid’s combat that only becomes more important as the game progresses.
An important Mechanic is the anchor or the pistol
Even though this attack is significantly less important than his Stagger Check, understanding how Lost Ark Gathering & Crafting works can still save people from taking a lot of unnecessary damage. Kallivan can use this attack at any time by conjuring up a large circle around himself that is divided into three distinct sections. The colors blue and red will be used to distinguish each section, and these colors are important. In the following round, Kallivan will either hold up the anchor in one hand or the flintlock pistol in the other hand, and whichever he holds up will indicate which color slice the players should move into. In case he raises the pistol, move to the red zone, and in case he raises the anchor, move to the blue zone. He’ll repeat this attack multiple times, causing damage to each player who happens to be in the wrong place at the time.
In the third section, you’ll defeat the swarming deep sea creatures as well as ghosts in Part 2
Following that is yet another mob-clearing section, which functions almost exactly the same as the first, albeit with a little more variety in terms of scenery. There isn’t much more to say about this section than to say that you should clear out any enemies in your path and keep moving forward.
The Fourth Section is titled “Karkosa’s Punisher.
Following that will be a battle against yet another deep-sea monstrosity, this time in the form of Karkosa’s Punisher. However, instead of being a Ghostly Boss, this one is more. . . tentacle-based in its design, and there is a lot less going on mechanically with Lost Ark New Abyssal Raid. For the most part, players only need to be concerned with the Pufferfish that this Punisher summons, and perhaps its Stagger Check as well.
Pufferfish Summon is an extremely important mechanic
Throughout the fight, Karkosa’s Punisher will summon a Pufferfish or two of the larger variety at random intervals to assist the party. All of these Pufferfish have a very basic moveset, and they always move slowly in the direction of the Punisher. In this case, the goal is to eliminate them long before they reach the Punisher, because if they make Lost Ark Gathering & Crafting to the Punisher, Lost Ark Gathering & Crafting will unleash a massive AoE attack that deals a lot of significant damage. Although not necessarily a wipe mechanic, the Pufferfish are significant enough that the entire party should shift their attention to them as soon as they appear on the map.
The Stagger Check is an extremely important mechanic
Even though this next mechanic isn’t all that important, it is at least a step above the standard attacks, and as such, Lost Ark Secret Treasure Map Location merits a little extra attention. Essentially, Karkosa’s Punisher has a Grab attack that picks up a nearby player and imprisons them in an orb of water that the Punisher carries while walking forward in a forward motion. Following Karkosa’s Punisher and attempting to drain its Stagger Bar as quickly as possible are the only options available to players when this occurs. If they fail, which is extremely difficult to do, the grabbed player will end up taking a significant amount of damage that could have been prevented.
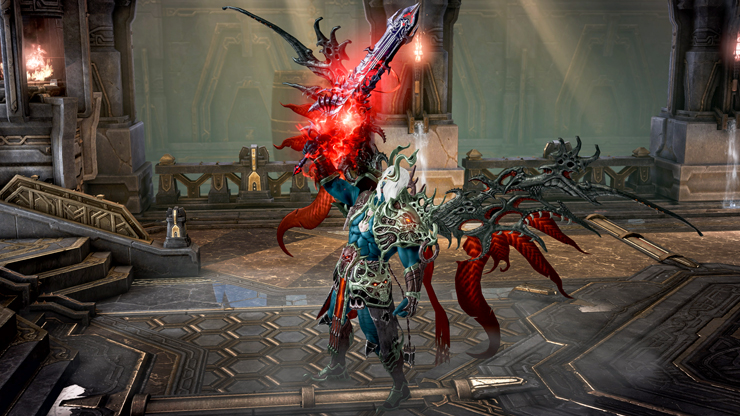
Drakhan, the Karkosa Monarch, is the fifth section
Let us now turn our attention to the final boss of Tranquil Karkosa, and the reason so many political parties are willing to cast a Surrender Vote despite the length of time it takes to get here. The Monarch Drakhan fight in Karkosa is nothing special in terms of a true boss fight. There are many attacks on it, but they are all fairly easy to ignore, and most players spend their time wailing on this massive turtle in an attempt to deplete its health as quickly as they possibly can. It is by far the easiest of the three Bosses in this Dungeon to fight against its normal attacks, and it is the most difficult to defeat. However, Drakhan’s Wipe Mechanic, and to a lesser extent, Constant Debuffing, are the source of the problem in this case.
Constant Debuffing is an extremely important mechanic
While the majority of players do not pay attention to this mechanic, it is beneficial to understand how works. Drakhan’s two heads are essentially specialists in different elements, each of which is represented by a different color. One is concerned with water, while the other is concerned with electricity. This can also be seen quite clearly in their normal attacks, which are quite effective.
For a brief period of time, every attack they use that is clearly based on water or electricity also inflicts a Debuff, which causes the player to take more damage from attacks that use that element for a short period of time. These Debuffs are also stackable, with a maximum of four stacks in total. Furthermore, when a player with a Debuff is then hit by an attack of the opposite element, an AoE attack is created around them, inflicting damage on their allies as a result. Exactly how large this AoE is is entirely dependent on how many Debuff stacks they had on them when they were hit by the opposite element attack. Additionally, this Debuff reaction can leave a small aura behind that deals consistent damage over a short period of time and lasts for a few seconds.